How to Grow Your Own Winecap Mushrooms
I started to think about growing my own mushrooms a few years ago. My mom was always foraging for mushrooms when I was growing up, but I didn’t become interested in them myself until my early twenties, when I was working on a farm in California and found a huge patch of chanterelles.
The excitement of that discovery quickly turned me into an avid mushroom forager and eater. Eventually, I started to wonder if I could grow my own steady (and affordable) supply.
I started with a grow bag of chestnut mushrooms (Pholiota adiposa). A grow bag is a sealed bag that contains a growing medium inoculated with mycelia, a threadlike network of fungal strands. (Mushrooms are the fruiting, or reproductive, body of the fungus; the mycelium is its vegetative body.) I put the bag on my kitchen counter, cut a big X on the front, and sprayed it with water every few days. Soon, I had a bountiful supply of mushrooms!
I decided this was something we had to try outdoors in the Discovery Garden. If you have the space, there are so many benefits to growing mushrooms—they can be grown in small spaces, they need fewer resources than many other food crops, and they are very nutritious. Plus, it’s a way to utilize shady areas where sun-loving crops won’t thrive.
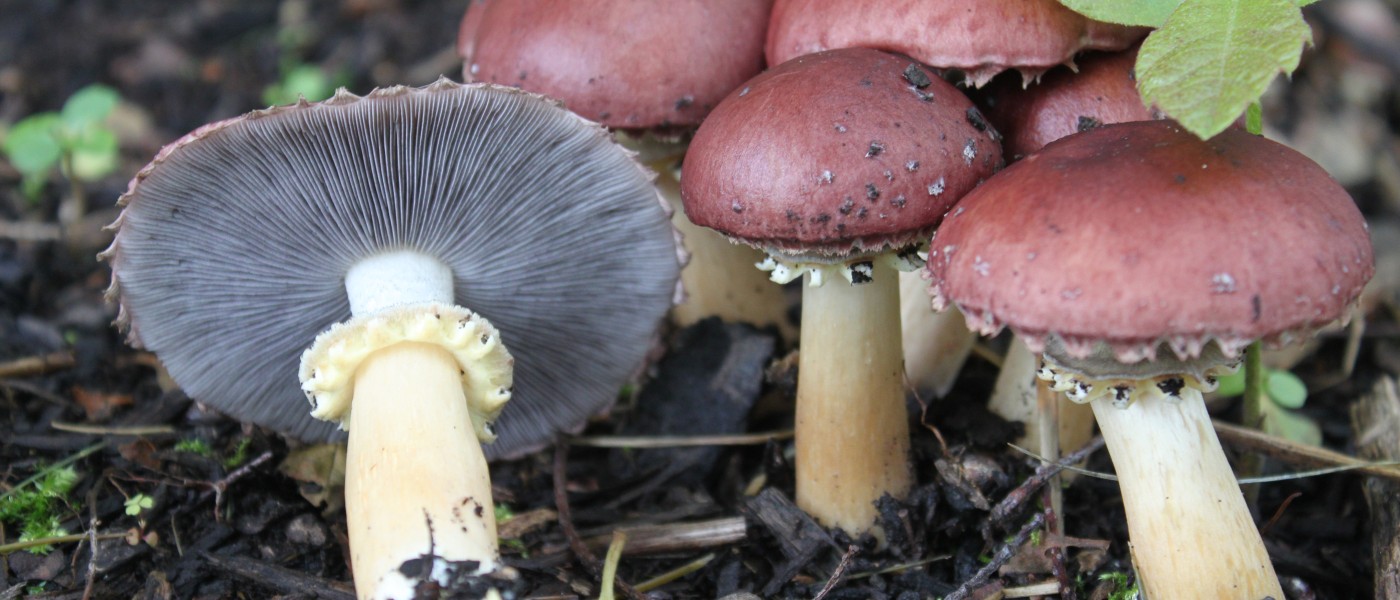
Winecap mushrooms (Stropharia rugosoannulata)—also known as “garden giants” because of how large they can get—are considered one of the easier mushrooms to grow, so they seemed like a good place to start. They also fruit faster than many other mushrooms. In the right conditions, they can fruit in as little as two months!
Like many edible mushrooms, Stropharia rugosoannulata is saprophytic, meaning it breaks down dead organic matter. Winecaps can be grown on wood chips or straw, and you can start them anytime from the last frost to a few weeks before the first frost. (In New York City, this means from early April to mid October.)
Site selection
You only need a few square feet of space to grow winecaps.

You can place them around other plants, if you’d like—under the shade of tomato plants, for example, or around a fruit tree or in a perennial garden. Winecaps prefer to grow in partial shade, but they can tolerate more sun than many other mushrooms.
Materials needed
- Winecap grain spawn. We sourced ours from North Spore, a producer based in Maine.
- Wood chips. Use freshly cut wood chips, if possible, to ensure that another fungus hasn’t already colonized them. Two local sources for free wood chips are Green-Wood Cemetery in Brooklyn and Cunningham Park in Queens.
Instructions
- Clear any debris, weeds, or mulch from the growing area until you have bare soil.
- Cover the whole area with a one-to-two-inch layer of wood chips.
- Sprinkle grain spawn over the whole bed.
- Repeat steps 2–3 about three times. (Like making a lasagna!)
- Top your bed with another layer of wood chips. Ideally the wood chips are about 6 inches deep in total.
- Water the bed thoroughly (but not to the point of sogginess).
- Continue to water the bed regularly as you would a vegetable garden, every few days or as needed. To check if the bed needs water, stick your finger in a few inches deep. It should feel damp, but not soggy—like a wrung-out sponge.
Harvesting your mushrooms
You should start to see mushrooms growing in two to six months. Check your bed frequently, especially after rain, so you can harvest them within the first few days after they’ve sprouted.

You can harvest your mushrooms in the button stage (when the cap is still attached to the stem) or after the cap has detached from the stem, but ideally before the mushroom has released spores. Younger mushrooms will have more tender stems. You can tell a mushroom has released spores if you see dark dust on the stem.
Your mushroom bed will continue to fruit for about three years. To help keep the bed healthy, add a layer of fresh wood chips on top every year.
Once your mushroom bed is established, you’ll be able to see a healthy mycelial network. This looks like a clump of a white, soft, stringy substance on and between the wood chips. (You can find this if you dig just a little under the surface.) If you want to start a new bed, you can spread some of the mycelia to a new area and use the same process as above.
Winecaps have a mild flavor, more vegetal than mushroomy. Always be sure to cook them thoroughly; eating raw or barely cooked mushrooms comes with a risk of food poisoning. They can be braised, sautéed, roasted, or used in soups, and they are delicious with pasta or on toast.